
The Transformation of the “Wallpaper House”
Okay, I know what you’re thinking. You’re wondering why I am posting about something that isn’t necessarily “woodworking” related. The reasons are because a) there were elements to this project that definitely were woodworking related, and b) this was a major project in our lives.
In the fall of 2002, we purchased a fixer-upper about a mile away from where we live. It took us about 2 months to complete. We were able to sell it for a handsome profit and we learned a ton along the way.
We instantly saw potential in the house. First it was a bargain. Second, there was space to increase the house from 2 beds to 3 — always a good move. Third, the house had charm such as 9 foot ceilings, spacious kitchen, and long-leaf pine floors. You just had to know where to look for the charm because of how outdated the entire place was.
Sarah and I worked on the house after work, and Paul came over to help most days. Sure, we had some long days, but we came out ahead financially. If we had to hire contractors for everything, we would have only earned a small profit. Since we both knew what we were doing (except for one major job: wallpaper), we saved a bunch.
We dubbed it the Wallpaper House because of the nightmare we had trying to replace the old wallpaper. No chemical or method worked very well to remove the layers of old wallpaper. In the kitchen, we uncovered at least 7 layers. Normally removing wallpaper is not such a burden, except for the fact that when they hung wallpaper 50 years ago they used an incredibly strong, nasty glue that solidified the wallpaper to the wall. The only solution was old-fashioned elbow grease and lots of scraping with putty knives. What should have taken us a couple of days took weeks. Other than the wallpaper headache, the rest of the house went quite smoothly.
Most of our changes were cosmetic, which is important when trying to flip a house. Here’s a breakdown of what we did:
Living room – ripped out the carpet, refinished the wood floors, painted the walls. While refinishing the floors I learned that you need to plan on spending $100+ just on sandpaper. It hurts to pay that much, but it is a necessary expense. I also learned that the old timers liked to use hundreds of small nails to secure the entire carpet to the floor.
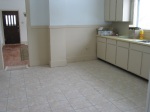
Kitchen – ripped out the nasty linoleum, installed tile, painted the cabinets, tore out the wallpaper and refinished the walls with a fresh texture and coat of paint. The kitchen took most of the time and money.
Bathroom – replaced the plastic tile with ceramic.
Bedroom 1 – installed new carpet and painted the walls.
Bedroom 2 – painted over the fake wood paneling and installed carpet.
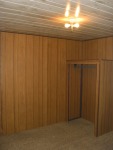
Bedroom 3 – made a new bedroom out of storage in the basement. There was an old window boarded up behind the wall that we replaced. Exposing the window and building a closet then qualified it as a third bedroom.
Now take a look at these pictures.
-

- Living Room Before
-
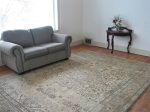
- Living Room After
-

- Kitchen Before
-
- Kitchen After
-
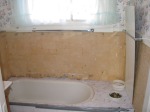
- Bathroom Before
-
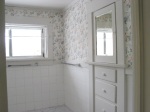
- Bathroom After
-
- Bedroom 2 Before
-

- Bedroom 2 After

Oh, did you have to bring up the wallpaper???? I’m trying to purge it from my memory. I was pretty pleased with the way this turned out though.