A Sturdy, Easy to Build Brooding Pen

•September 26, 2011 • Leave a Comment

We bought some heritage turkeys this summer. Penciled Palm, Mottled Black, and Blue Slate. They weren’t big enough to send out to the big pen, so I built this brooding pen in about an hour.

I probably could have built it in half the time had my tools been set up and I wasn’t creating the plans as I built it. Overall, I’m pleased with how the pen turned out. It keeps the birds safe, and it is also sturdy and affordable = all criteria for the pen.

Sorry, no plans for this one since I basically just created it ad hoc. If any of you express interest, I may scribble something out. But hopefully the pictures provided below will be enough for you to figure it out.

The dimensions of the box are 4 feet by 2 feet by 3 feet tall. I also drilled several holes in the bottom to allow for drainage should the water ever spill…which happens more often that I like with birds.

The lid just rests on the top of the box. You could easily add hinges if you have them.

How do the birds like it? They love it. 

Materials: One 5/8 sheet of OSB. Four 2x4x8 and one 2x4x12. Scrap chicken wire. Nailes and screws.

A No-Hassle Technique to Pickle Wood

•January 2, 2009 • 78 Comments

pantry_smallStep into any furniture store and chances are you will see a pickled finish on at least one item. You might spot it on a bed, dresser, table, desk, and even cabinet. A pickled finish is one of the methods furniture makers use to “antique” their projects, and it is quite a popular technique.

In the simplest terms, pickling is a finishing technique that whitens wood. Although you can find pickling stains sold in most hardware stores, technically pickling is a method and not a finish. I’ll explain more about the method below.

Many sources claim that oak and ash are the most common woods pickled; some even claim these are the only two woods you can pickle – not true! You could pickle any wood, however you would probably have better results staying with lighter colored woods. For my project, I used pine.

You can buy a pickling stain or you can make your own. Let’s talk about how to make your own.

Here’s What You’ll Need

  • Sandpaper (150 – 220 grit)
  • 1 quart of white paint (less if your project is considerably smaller than my pantry)
  • 1 quart of water
  • Mixing can (I just used the paint can)
  • Paint brush(es)
  • A cloth (soft and clean is best)
  • Varnish / polyurethane
  • Dark dye or stain (optional)

You can use oil or latex paint. The material list above is geared toward latex (i.e., water-based) since that is the type of paint I had leftover from a previous project. If you choose oil, you’ll need about a cup of paint thinner instead of water. Everything else is the same.

There is some debate as to whether you should use primer or regular paint. Some claim primer works best because primers have better coverage and come in dull, flat finishes that won’t add any shine to the wood surface. I tried both regular paint and primer and noticed no apparent difference. If you only have regular paint, and you are concerned about the shine, just use a flat paint instead of glossy.

Here’s How to Create an Amazing Pickled Finish, Step by Step

1) Prep the wood.

The general rule when finishing wood is that if you can see a blemish before you apply the finish, the blemish will be magnified by the finish. Make sure you take the time to sand your project well. Smooth out any sharp edges or corners. For the pantry, the plywood needed extra sanding because of unsightly pits in the wood.

Once the project has been sanded, clean off as much sawdust as you can.

Optional Step: Wet the wood.

Depending on the species of wood you use, and its grain patterns, you may want to wipe down the entire project with a wet sponge. Allow the wood to dry, then sand with about 150 grit sandpaper. The water raises the wood fibers before you apply the stain, which can still be sanded smooth without removing any stain. Otherwise, the liquid in the stain could raise the grain.

I tested the wood on my project beforehand and found that wetting the entire pantry wasn’t necessary. The plywood and pine boards simply did not have any noticeable grain raise.

2) Make the Stain

Mix water with latex-based paint to create the stain.

Mix water with latex-based paint to create the stain.

This next step is not science. I had about a quart of paint leftover in a gallon can. I started by adding 1 cup of water and then ended up pouring in about 2 cups of water total.

Mix the water with the paint. The amount of water you add isn’t too important because you will be wiping away most of the paint anyway. Just make sure it is thinner than the original paint but not as runny as straight water.

One thing that is important is to mix enough stain to provide coverage for the entire project. Otherwise, if you have to remix the stain, you might have one solution brighter than the other, and that wouldn’t look good. Or, if you want to make pickling a science, just remember the exact portions of paint and water you mixed. Then repeat the portions.

3) Wipe On the Stain.

Apply a generous coat of stain.

Apply a generous coat of stain.

Use a brush since it’s easier to reach into corners than just using a rag. Apply a thick coat of the stain on a manageable area – not so much that it completely dries before you can wipe it down with a rag.

At this stage, it’s not important to worry much about wiping the stain in the direction of the grain, unless of course you allow the stain to dry before wiping it down. More on that later.

4) Wipe Off Excess Stain.

Use a rag to wipe off excess stain.

Use a rag to wipe off excess stain.

Before the stain dries completely, use a damp rag to wipe away the stain. Depending on how hard you press, you can wipe off almost all of the stain or leave most on. It’s mostly preference. Just make sure you keep the surfaces of the wood the same consistency of whiteness.

At this point, I like to wipe the stain in the direction of the wood grain. However, don’t stress too much over this because the rag smooths out most noticeable strokes.

Tip: It’s a good idea to use some leftover scrap wood to test the finish. This will give you a good idea as to how well the wood accepts the stain. I found that the pine boards did not absorb as much as the plywood, which helped me gauge the amount needed for each surface type.

5) Repeat Steps 3 and 4

Adding another coat will result in a whiter, less transparent look. For the pantry, I applied 3 coats of stain because it matched the dinning room better than having only 1-2 coats. Also, by applying 3 coats I was able to match the plywood with the pine boards perfectly.

6) Apply Varnishspray-on-varnish1

Varnish is important because your pickling finish is basically a wash, which can be, well, washed off. Not easily, but it can happen, especially if you might use any cleaners or other chemical products on your project. To protect against the finish washing off, apply a coat of non-yellowing varnish.

If you decide to follow Step 7, it’s a good idea to apply a coat of varnish to the project now. It will help prevent against any possible muddying up that may occur between the pickling stain and the accent stain. Some people suggest using a spray-on varnish, which I used but did not find necessary because the pickling had completely dried and does not wash off very easily.kelthane2

If you don’t follow Step 7, just wipe on a coat of varnish. I used my favorite varnish, Kel-Thane. It is very important to work the varnish in the direction of the wood grains. I also purposefully used a brush to give a subtle texture of grain to the wood.

7) Optional Step: Apply a Dark Stain

Gel stain.

Gel stain

If you want to add more of an antique feel to your project, like I did with mine, follow this step. I purchased a gel stain from my local craft store (a dark walnut color). You pick whatever color matches your project best.

I mixed the gel with water so that it would be easy to apply. For this accent stain, the runnier it is the better because you need to be able to wipe off as much as possible. Use a clean rag to wipe off almost all the accent immediately after you wipe it on; it dries quickly. Note: A little goes a long way, so start sparingly. I made sure to follow the grain direction with this accent stain. It is crucial to follow grain direction on this step.

apply-accent-stain

Wipe on the accent stain. Notice the small amount of stain on the plate.

Tip: Test out the accent stain in an inconspicuous location first – either on scrap lumber or somewhere unseen. I tested it on the underside of one of the shelves before proceeding to apply it on the whole pantry.

Apply one more coat of varnish once this accent stain has dried.

Close up of accent stain

Close up of accent stain.

You are now finished with your finish.

May 17, 2012

We stayed in a cabin last winter that had the logs and furniture pickled. Very cool. I took some pictures with my phone. Not the best quality but you get the idea.


Build this Entertainment Center Using Stair Tread

•December 15, 2008 • 5 Comments

entertainment-center1

I am finally getting around to posting about the entertainment center I built this last summer. Ya’ll have probably seen it by now anyway.

Design Considerations

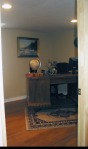
To begin, since our house is quite old, we wanted to suggest it has been updated through the use of decor, yet we did not want to overdo it. The entertainment center was the solution. We wanted a modern style entertainment center that would not detract from the old architecture of the house while at the same time give the home an updated feeling.

We were aiming for a Pottery Barn style entertainment center without needing to fork out $ hundreds. And it’s always more fun to build your own furniture anyway, right? The center features convenient storage options for display items such as vases, books, bowls, etc. and also provides space for movies, TV, dish box, and DVD player. Sarah likes to change out the displays depending on the seasons or holidays, and with this design it is real convenient for her to do just that.

Three modules make up the entertainment center. Two tall, narrow side modules and one wide, short module in the center. A shelf on the top ties them all together, adding additional support to the entire entertainment center. The television rests of the middle module, as does the DVD player, dish box, and a basket for movies. As mentioned already, you can use the side modules for decorations as well as additional storage, if needed.

The crucial board in this design is the center brace under the TV. If that wasn’t there, the whole unit would sag.

The Materials

Using 1″ material (which is actually 3/4″ thick) would be too thin, and 2″ felt too wide and bulky. Still, for a while there I considered using 3/4″ boards and building a face frame to give more width. That sounded like more work and I wasn’t sure the results would be what I wanted — classic instead of modern. Another problem was cost; buying 1×12″ lumber is expensive these days, and you are lucky if you can find it in a lumber yard. Instead, I came up with a great solution.

Stair tread.

You heard it here first. Yes, the entertainment center is constructed out of composite stair tread.

I know. I have constantly bashed using composite material for furniture for years now, and rightly so. However, for this project I wasn’t concerned about building a piece of furniture that would last generations. Rather, we needed something that helped stage our house and give us the organization we needed. Hence, stair tread. It’s the perfect thickness (1 1/4″) and already has a rounded edge. It’s also the perfect width at 11″. I forget the price, but it wasn’t very much. Maybe $20 or so for the tread.

The shelves are made out of shelving boards. Shelving comes in composite material and also has a round edge. It’s 3/4″ thick and gives the shelves the right contrast against the thicker stair tread.

The Construction

Here are the basic steps to construct this modular entertainment center.

Note, the only power tools that you will need are a miter saw, drill, and hand sander.

1) Start by cutting the stair tread first. Cut seven boards at 60″ each (remember, the tread is already the correct width of 11″). These boards make up the two sides of both end modules, the top and bottom of the middle module, and the shelf that bridges the gap between both side modules.

Miter the ends of six of the seven boards at 45º angles; cut the remaining 5 foot board, the shelf, at 90º. Here’s a tip. It’s easier if you first miter one of the ends at 45º and then measure 60″ from off of the angled edge. That way, you only need to worry about measuring one mitered edge. Also, make sure you miter the boards so that the rounded edge faces toward you, not the wall.

2) Next, cut four boards at 16″ each. These boards are used for the tops and bottoms of the two side modules. You will also need to cut the ends for the middle case at 26″. All of these boards are mitered at 45º angles.

3) Cut the remaining board for the shelf inside the middle module at 28 3/8″ long. Don’t miter it. The thicker stair tread is important for this shelf because it grants greater strength to span the distance and to hold heavier loads, such as the DVD player and dish box.

4) You should now be finished cutting the stair tread. Next, grab the shelving material, which is 11″ wide by 3/4″ thick. You will need 6 boards cut at 13 1/2″ long and one board cut at 23 1/2″ long. The 13 1/2″ boards are used for the three shelves in each side module, and the 24″ board is used for the center brace inside the middle module.

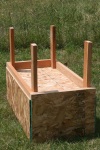
5) Now it’s time for assembly. Start with the side modules. Grab four of the 60″ stair tread boards and lay them down flat. Take extra time to line up the bottoms perfectly with each other and then check for squareness by measuring from corner to corner. Use a pencil to scribe the location of each shelf, which, starting from the bottom, is on 16″ centers. If you lay out the boards this way, you only need to measure the location of each shelf once (vs. four times for each shelf) and you can be at ease knowing your shelves will all line up.

Note, when lining up the boards, ensure the curved edges of the tread will face outward once assembled.

6) Attach the 16″ mitered boards to the 60″ boards you just marked for shelves, to form the tops and bottoms of the cases. I used screws and a little glue. You could use brads instead of screws, but you will need to wait longer for the glue to cure before doing too much more. Once completed, the basic structure of each side module is done.

7) Drill pilot holes into the sides of both end modules. Use 2″ screws to attach the 13 1/2″ shelves. I used deck screws because the heads bury easier in the wood and don’t leave unsightly bulges in the tread.

8 ) Finally, attach two scraps of lumber cut at 1 3/4 x 1 3/4 x 11″ on the inside, top edge of each side module. These two blocks will support the top shelf.

9) The side modules are now built. Next, build the middle module. Start by attaching the two end boards, which are 26″ long. Mark the center of the case, which should be 30″. Then drive screws into the middle brace, which is the 3/4″ by 23 1/2″ board. Measure up 13″ from the top of the bottom of the brace board, and this will be the location of the final shelf. Attach the 28 3/8″ long board for this shelf.

I waited to attach the three modules and top shelf together until the entire project was finished and moved into the living room. I then simply secured the three cases together with screws, and used screws to attach the shelf. These screws are not plugged so that I can have easy access for taking apart and moving the modules in the future.

Finishing

I bought a high-gloss enamel paint. Before painting, the stair tread required some additional filler along the rounded edge. I used spackle to fill the edges and the holes from the screws. I then primed all the pieces, allowed them to dry and applied the enamel paint.

Overall, the entire project took less than a day. The longest task of the project was waiting for the spackle and primer to dry.

Plans

With all plans I’ve included, I vacillated on including plans or leaving them out. Selling plans is big business. On the other hand, this entertainment center is so simple to construct that plans are hardly necessary. In the end I opted to include them.

So, to see my plans of the entertainment center, click here.

Modern Entertainment Center Plans

•December 15, 2008 • 2 Comments

Thankfully, after 5 or 6 months I still have the plans for the entertainment center. As mentioned before, you will notice that I prefer to work off of handmade, crude plans. Hey, what can I say? They work for me.

entertainment-center-plans

How to Install Hardwood Flooring on Concrete

•October 14, 2008 • 3 Comments

Two weeks ago I unveiled my new office, complete with hardwood planked floors. Since the room is located in the basement, I had to figure out a way to install the flooring on concrete.

I came up with three options and chose the best one for this particular project. Can you guess which one I used?

Method 1

The first approach is to glue the boards directly onto the concrete pad. This is the fastest way to install flooring, but there are drawbacks. I count three:

  1. Since concrete pads are rarely perfectly flat (or smooth), the flooring would probably not lay level.
  2. I lack enough weights to brace the wood down until the glue cured. Without the weights, you risk having air bubbles/pockets between the boards and the concrete.
  3. If any boards need straightened, which will always be the case when installing wood flooring, it would be impossible to use a pry bar in the concrete.

Method 2

The second option is to glue down a subfloor of OSB or other sheet wood directly to the concrete, then secure the hardwood to the subfloor. This will give you a flat surface and also allow you to sink a pry bar into the wood subfloor to persuade any crooked boards to fit snugly with its neighbor.

There are shortcomings too:

  1. It takes longer to install because you need to first wait for the subfloor to bind to the concrete before installing the flooring.
  2. Since the planks are much wider than traditional hardwood floors, you cannot fully nail down the entire board without exposing some nails or screws.

Method 3

The final solution has some similarities with Method 2. You start by securing the flooring to the OSB subfloor before gluing the OSB to the concrete. The main advantage is that you can hide the screws/nails because the boards can be screwed from the OSB side vs. from the face of the boards into the OSB. Just make sure you buy screws that are about 1 1/4″ long or there will be sharp points sticking through.

The disadvantages to this approach are:

  1. Each sheet will weigh a lot so it becomes a chore to muscle each one around.
  2. It’s difficult, though not impossible, to use a pry bar to help straighten boards since you are attaching screws from the backside.
  3. You need to make sure the flooring aligns up with each sheet. In other words, you are stuck to exactly 4 ft wide sections. Not a big deal, but ripping 10-11 ft long oak boards by yourself isn’t that much fun either.

I chose….Method 2. For a while I planned on Method 3. If I had an extra set of hands and could find 12 ft OSB sheets, then I probably would have stayed with that approach. Since my room is 11 feet x 11 feet, I was concerned about the unsightly seams that would be caused by having to use 8 ft and 3 ft sheets of OSB, which ultimately made me change to Method 2.

It’s also a good idea to install a moisture barrier between the OSB and the concrete. Concrete is known to sweat, which could damage the subfloor.

To hide the nails, I first considered boring out small holes for screws and then pound in plugs. It would be impossible, however, to completely hide the plugs. Instead, I glued each board using tubed glue similar to liquid nails. I then nailed brads into the boards for extra support while the glue cured. The brads were easily hid by tapping them into the wood and then applying a small amount of wood putty into the hole.

The brads were not strong enough to hold the board stationary if it needed straightened more than 1/8 inch, but otherwise fulfilled their purpose.

With large planks like this, I still ended up with some unsightly gaps. Watch this video to learn what I did to fix the problem.

Here is a picture showing the subfloor.

osb-subfloor1

A New Office with Hardwood Planked Floors

•September 30, 2008 • 5 Comments

The last of the major house projects is done! <three cheers> We have upgraded our house from 2 bedrooms 1 bath to 5 bedrooms 2 baths. We’ve easily doubled the equity in the house, even in today’s market.

I converted the old pantry into a luscious office space/fifth bedroom. It has received glowing reviews. As with the bathroom, it is almost impossible to picture what the previous room looked like.

The highlight of the room is the oak planked floor. I knew it would look good, I just didn’t realize it would look that good. It is the wood I brought back from Atlanta. The boards vary in widths of 6, 8, and 10 inches. I applied a light cherry stain and three coats of kelthane (similar to polyurethane, but with better coverage).

The most work was planing the wood to the right thickness — 7/8″. Planing would have been easier with a stronger planer; the Dewalt 13″ benchtop didn’t have the muscle to pull and cut the long, heavy boards. After pushing 90% of the boards through the Dewalt, Jeremy let me use the 15″ Jet planer at the Jr. High for the few that were left. Huge difference.

Next shop upgrade will be a stronger planer.

Sarah encouraged me to decorate the office with a “Lars” theme–swords, mounted insects, fossils, books, art, figurines (basically eclectic), and she didn’t need to tell me twice. She says the office now matches my personality, and I tend to agree.

The following pictures show the same room before the remodel and after. Like I said, it’s hard to imagine that it was once a scary pantry.

Tour of an Aged Sawmill that Still Works

•August 20, 2008 • 1 Comment

Dad, Chuck and I just returned from touring Sauders Mill in St. Anthony. If I learned only one thing when touring a sawmill, that would be to bring ear protection next time.

Sauders Mill is small enough that they custom mill lumber for customers, and large enough they produce about 10,000 bf of lumber on a good day.

As can be seen in the pictures below, most of the machinery is quite old. The owner explained how breakdowns are fairly common with his operation. Because of the age of the equipment, most parts are not manufactured anymore and/or are slow to get in stock. To keep business going when a breakdown occurs, they have a small machining shop on site where they can create most of the parts they might need.

Log Loading Area

A loader with a huge fork bucket dumps logs into a pond. The water gives the logs a quick bath to help wash away any rocks or other debris that might interfere with the cutting. The operator (or bather) guides the logs along with a long pole. He butts a log up to a fence where he then uses a 6-foot chained blade to cut each log to a predefined length.

A hydraulic lift then hoists the sized logs onto a log deck to await the fate of the headrig.

chainsaw-cutoff-tool3

Primary Saw Circular Saw

I mentioned the machinery was old. Did I also mention powerful? The ground shook near the main circular saw. And the gang saw rattled the building.

The primary circular saw is joystick controlled. The carriage is hydraulic fed. It rips the logs into dimensional cants in no time. The cants vary in size depending on how large the log is. Sorry, no pictures of the saw because the area was too dark. (That, and I felt very, I dunno, exposed leaning over a wobbly guard rail to snap a picture.)

Gang Saw

The circular gang saw is perhaps my favorite machine there. It can cut up to eight boards in one pass.

Once a cant has been cut by the headrig, the cant travels to the gang saw. The gang saw operator changes the settings of the saw based upon the size and quality of the cant in order to optimize the lumber.

Notice the two tires. This was something the owner’s dad invented to keep the wood aligned. Simple and effective.

gang-saw-back

gang-saw-close-up1

Cutoff Saw

The cutoff saw was built by the owner’s dad and it works like a charm. Those old timers sure had ingenuity. It operates by one large motor that uses a chain to spin a shaft. The shaft connects to two very large circular saw blades. The cutoff saw operator simply adjusts the fence to the desired board length and then drops the lumber down a shoot. The blades do the rest.

cutoff-saw

Sorting Station

After being cut to size by the cutoff saw, the lumber slides onto the lumber deck. One guy is able to keep up with the whole operation, which was quite impressive. Since the sawmill cuts various dimensions of lumber throughout the day, sorting the lumber is a constantly changing task. He quickly identifies the length and thicknesses of the board, then stacks it on a neat pile using drying stickers.

lumber-deck

stacking-area

Waste Control

All debris eventually makes its way to a conveyor system. The large chunks of are broken to chips after passing through this massive chipper.

chipper

Seeing an old sawmill like this was a great educational experience.

As you can see, my dad thought so too. ; )

dad-at-sawmill

Custom-Built Fireplace Mantle

•August 17, 2008 • 1 Comment

My brother Andrew has built a stunning fireplace mantle. He saw an example he liked and basically made the entire thing with just a photo as a reference. It’s quite large, probably 6′ x 6′. There are layers of trim stacked on top of each other, giving the mantle many depths.

I’ve never built a mantle. Watching him piece it together this summer has given me the confidence that I can do it…and also makes it clear that mantles require a long time to build from scratch.

He chose MDF and poplar for the wood. MDF was a good choice because of how well it takes paint. Poplar gives the mantle added stability and also finishes well.

He made a jig for some of the custom trim (see picture below). The jig allows him to cut exact strips of wood every time without the need of measuring. I’ve seen similar examples of this jig in some of the woodworking magazines, so check there if you want to know how to build one.

custom-mantle

jig

This jig is designed to give you exact cuts on the tablesaw every time.

jig-2

From a Nightmare Space to a Dream Bathroom

•March 22, 2008 • 2 Comments

Paul and I finally finished the basement bathroom. I’m happy with it. Now just one major project left and the house will be fully updated.

The bathroom feels like a spa. The whole design of the area — paint, tile, accessories, came together with striking results. It is difficult trying to picture the old space.

This has been my most challenging project to date. There are at least three reasons it was so challenging. The first and main reason is because neither of us had any previous plumbing experience, let alone knowing anything about the old way of plumbing. We underwent a crash course on drains, water lines, vents, etc. Second, is because we were very limited in places to hide the new piping. And third, we had to allow access to water and sewer the majority of the time since we were living in the house while remodeling it.

We replaced all of the old drain pipes and water lines. It was scary to see how corroded they were. The main advantage I see behind cast iron is that it is heavy and absorbs sound better than ABS. Other than that, I rest better knowing my house is outfitted with PEX and ABS instead of galvanized and cast.

Now that we have conquered this job, I feel confident I can fully plumb a complete house.

We kept the entire project under $2000. Not bad for building a new bathroom and completely replacing out the old plumbing. I can almost hear you asking how we kept the cost so low? Here’s where the money went (approximately):

  • $600 for the sink, toilet, and fixtures.
  • $400 for the new plumbing (including tool rentals)
  • $400 for tile, grout, backerboard, etc.
  • $150 for wood, sheetrock, paint
  • $50 for the window (remnant)
  • $50 for miscellaneous
  • And the rest for Paul’s wages (I’ll let you do the math!) And, uh, thanks again Paul for being willing to help me out for those couple of weeks!

The only drawback to the bathroom is the limited space. It would be absolutely perfect with about 30-40 more square feet. Maybe in the next house.

The following are pre and post pictures of the same space.

Giving New Life to an Ugly, Broken Dresser

•January 3, 2008 • 1 Comment

When we moved back to Idaho, the tenants who were renting our house left a dilapidated dresser. I almost threw it away, but in the end decided to refinish it. It was made out of real wood so I figured there was potential with the piece of furniture.

In preparing to have everyone over for our big New Year’s party, we repainted Rachel’s room, bought some new decorations, and refinished an old dresser and bookshelf. (You’ll recall I made Rachel’s sleigh bed for Christmas, so we had to finish making her room look good for the big event.) It was a busy week with lots of late nights, but the improvements to her room were worth it.

You wouldn’t believe how much the dresser changed. I only wish we had thought to take pictures of it beforehand. So instead of seeing photos, picture in your mind this: worn wood on the drawer fronts, missing knobs, a broken foot, a missing side panel, and a cracked top. If the word “ugly” came to mind, then you pictured our old dresser.

Here’s what I did to refinish the dresser.

  1. I first stripped the old finish off. I used paint stripper for the hard-to-reach areas, namely corners and groves. For everywhere else, the hand-held belt sander did the job. Removing the old finish probably only took about 2 hours.
  2. I cut a new side panel out of stronger material than the flimsy cardboard stuff that had broken. I used a 3/8″ piece of scrap plywood.
  3. I traced a pattern of the good food and then cut out an exact replica. I then glued and nailed the new foot on and hid the gap with spackle.
  4. I filled all other cracks or holes in with spackle.
  5. I painted the dresser white and the side panels pink.
  6. Finally, I attached new knobs.

Total refinish time was probably about 4 hours.

It really turned out cute. It looks just as good as what you see in expensive stores such as Pottery Barn. So without spending more than $5, I gave Rachel a new dresser that looks like it’s worth a couple hundred dollars.

If you ever see a dresser while garage sale shopping, first check to see if it’s made of wood. If it is, it might be an ideal candidate for a furniture restoration project. (If it’s constructed out of that junky composite stuff, just politely walk away.)